Your website header design is essential to having a successful website (or blog).
Your header is the first thing that your visitors see and play a key role in grabbing their attention. More importantly, it should establish a strong connection with your users.
Remember, there is never a second chance at a first impression so pay close attention to making a good first impression on your website visitors.
The following post is what I have found in my time marketing small businesses and hours of research.
When someone visits your website, research has found that their eyes look over your website like a book. Left to Right… Top to Bottom… So as we go through the rest of this post and discuss your website header design, please keep this in mind.
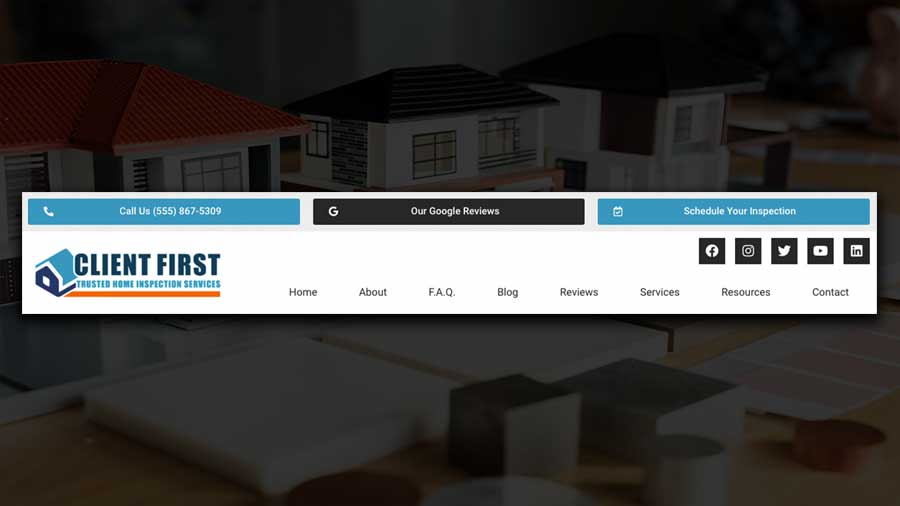
When it comes to your website header, there are a few things that are AN ABSOLUTE MUST!
4 Things Your Website Header Design Should Include
- Logo
- Navigational Menu
- Social Media Links
- Call-To-Action
This can be done very easily. Once again, I need you to understand that your header will either help or hurt your conversion from a website visitor to a potential client. So keep your clients in mind and think like your visitors when designing your header. My #1 tip is to keep it simple and easy to use/navigate.
You should also keep in mind that the only thing you NEED is your logo & navigation. So you can choose to not have a “Top Bar”.
Top Bar – This is normally where I would put things like social media icons that link out to my social media profiles, phone number as a “Call Me” or “Text Me” call-to-action button, a link to your Google Business Profile, or maybe an address if you have a physical location. You also want to think about if you want a specific background & font color.
Header Hero Section – This is where you will normally have your logo & website navigation. Remember you want to keep it simple so I wouldn’t do much more than those two things. At most, you can include a third column If so it should be something that is clean and easy to understand/use.
Overall, your website header design can include anything you want. The elements you include are up to you. Remember, only you know your target market and if you used canned advice, your conversions from visitors to being clients, may not be what they should be.
You will find some of the elements you can include in your header in the list below. (Use your best judgment when including these elements)
- Brand Logo
- Brand Tagline
- Telephone Number (This should be a live link to either call you or text you.)
- Email Address (This should also be a live link- View link above)
- Physical Address
- Navigation Menu
- Search Field
- C.T.A. (Call To Action)
Keep in mind that these are examples of what you can include in your website header design. Not all of these need to be used. Remember, just like I said earlier, only you know your target market so keep them in mind when deciding which of the elements mentioned above to include in your header.
***NOTE: If you are using either of the Home Inspector Website Templates, your header will be predesigned for you. If you are building a website from scratch, we’ll cover how to make a header below.
Website Header Design Tutorial
Now that we have an understanding of the website header and what to put in your site header, let’s jump into the tutorial for building a website header with Elementor Pro.
Inside of the website design webinar, we are using the WordPress Plugin Elementor Pro to design our website header.
The first thing we are going to do is go to the Elementor Tab in the sidebar within your dashboard and click on “My Templates”

Once you get to the “My Templates” library you need to click on the “Header” tab at the top of the page to get to the header section.
Then the next step is to click on “Add New Header”

Once you do that you will see the create new template panel where you need to “Select Your Template Type” (which should already be set as “Header”) and then you need to name your website header design (for this tutorial I’m using “Website Header”).
After you finish that step then click on “Create Template”

This will bring up a blank canvas for you to design your header. You can use templates if you want, or you can create your website header by adding one element at a time.
If you want to have a custom website header design then start by closing out the template window and start designing your header.
If you want to use a template then you are already viewing the available free header templates for WordPress which comes with Elementor. Some of the templates are exclusive to only the Elementor Pro premium plugin.
Take a second and browse through the available header templates and when you want to see it in full resolution just click on the image of the template.

Once you have the website header template selected that you want to use, all you need to do is click on “Insert” & it will import your template so you can start customizing your header with your content.
If you are using the “site logo” setting for the image element then you need to work on your “WordPress Customize Settings” if you haven’t already.
After you have designed your website header the way you want it (you can always come back and fine-tune it later) you’ll need to click on the “Publish” button. After you do that you will then set the “Conditions” for your header.
Click on “Add Condition” then be sure it “Includes” the “Entire Site” and then click on “Publish”.
And just like that, your website header design is complete.

