Not every page on your website will be in your navigation menu in your header. Sometimes you need to have more information than what will fit comfortably inside of your header. That is where the website footer design comes in.
Your website footer is the last chance to grab your
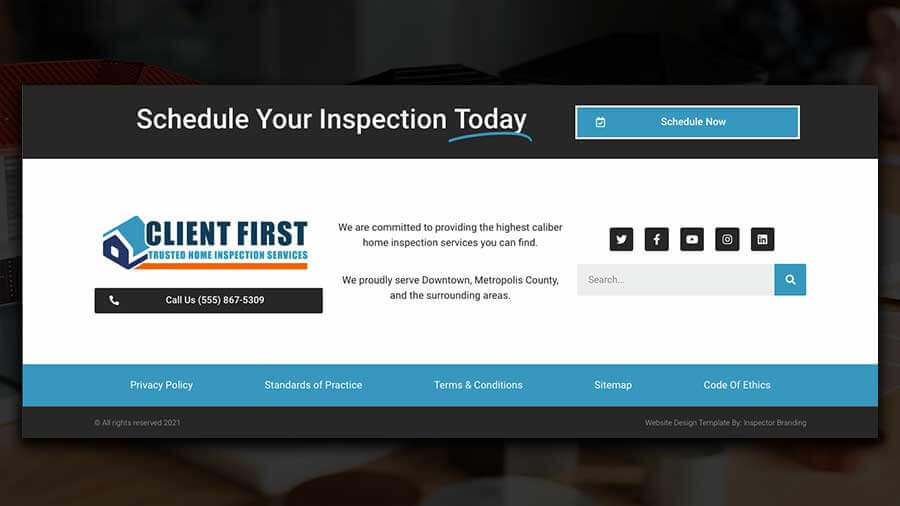
The following is a list of ideas for things to include in your website footer.
- Copyright – Let’s be 100% honest here. There are some people who will go to websites and simply copy and paste the content onto their own site. Having a copyright section in your footer is a must. Even if it is about the only thing you have. Normally, it will look something like this: ©2022 YourBrandsName.com
- Legal Pages – This is another precautionary measure. Don’t Get Sued! There are many different legal pages that I suggest for home inspector websites. (Privacy Policy Page, Terms of Use Agreement, Standards of Practice, Code of Ethics & Earnings Disclaimer) ***Please check with a lawyer to get the proper terminology***
- Sitemap – This is the navigation roadmap for search engines. Your sitemap helps them find content on your website.
- Contact Page – If someone is wanting to contact you, they’ll start by looking in your website header but the second place people look for a link to contact you is right here inside of your website footer design.
- Contact Information – While most people put in a contact page link, you should also put in your email address, phone number, mailing address
and other direct contact info. - Navigation Menu – Help your visitors find your content with a second navigation menu in the footer. This can be the primary menu that you have in your header or some additional menus to help your visitors navigate through your inner pages.
- Social Media Icons – With today’s internet, social media is a staple to branding and engaging with your potential customers.
- Email “OptIn” Form – It doesn’t matter if it is for a “Newsletter” or just to receive “Updates” about “YourBrandsName”
- Mission Statement/Vision Statement/Core Values – Use this section to let people know who you are and what you are about. (Writing a Mission Statement) (Writing a Vision Statement) (Writing Your Core Values)
- Recent Blog Posts – This is the last chance to grab your visitors attention and having a list of recent blog posts inside of your website footer design can keep your visitors going deeper down the rabbit hole.
- Call-To-Action – Get your visitors to do something. Schedule a home inspection, Call Us, Text Us, etc., there are limitless things you can get them to do but never underuse a call to action (CTA)
- Certification #’s – If you have a certification number, having the certification number in your footer is a must have in some states. Please check with your states rules for this.
Keep in mind that these are examples of what you can include in your website footer design. Not all of these need to be used. Only you know your target market so keep them in mind when deciding which of the elements mentioned above to include in your footer.
NOTE: Just like the Website Header Design, if you use either of the home inspector website templates, your website footer will be designed for you. The tutorial below is if you are starting from scratch with Elementor.
Website Footer Design Tutorial
Now that we have an understanding of the website footer and what to put in it, let’s jump into the tutorial!
We are using the WordPress Plugin Elementor Pro to design our website footer.
The first thing we are going to do is go to the Elementor Tab in the sidebar within your dashboard and click on “My Templates”

Once you get to the “My Templates” library you need to click on the “Footer” tab at the top of the page to get to the footer section.
Then the next step is to click on “Add New Footer”

Once you do that you will see the create new template panel where you need to “Select Your Template Type” (which should already be set as “Footer”) and then you need to name your website footer design (for this tutorial I’m using “Website Footer Design”).
After you finish that step then click on “Create Template”

This will bring up a blank canvas for you to design your footer. You can use templates if you want, or you can create your website footer by adding one element at a time.
If you want to have a custom website footer design then start by closing out the template window and start designing your footer.
If you want to use a template then you are already viewing the available free footer templates for WordPress which comes with Elementor. Some of the templates are exclusive to only the Elementor Pro premium plugin.
Take a second and browse through the available footer templates and when you want to see it in full resolution just click on the image of the template.

Once you have the website footer template selected that you want to use, all you need to do is click on “Insert” & it will import your template so you can start customizing your footer with your content.
If you are using the “site logo” setting for the image element then you need to work on your “WordPress Customize Settings” if you haven’t already.
After you have designed your website footer the way you want it (you can always come back and fine-tune it later) you’ll need to click on the “Publish” button. After you do that you will then set the “Conditions” for your footer.

Click on “Add Condition” then be sure it “Includes” the “Entire Site” and then click on “Publish”.
And just like that, your website footer design is complete.

