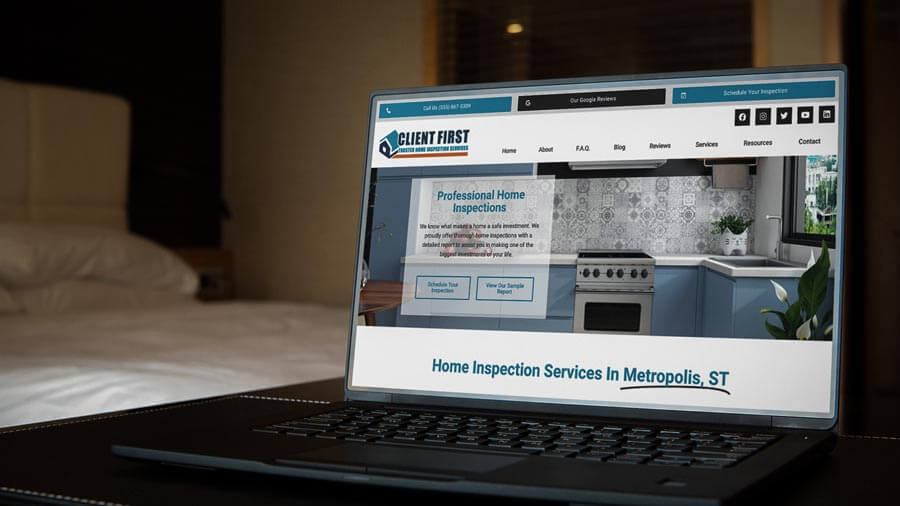
Let's Make A Home Inspector Website!
In a little bit, we are going to go over what is included in the download folder for the home inspector website template but for now there are a few things we need to cover before we can build our website.
How Much Does It Cost To Make A Home Inspector Website?
I’m going to do a basic price breakdown of how much it costs to make a website for home inspectors with the Ultimate Home Inspector Website Template & everything else you are going to need. But I’m going to price it with the full price of everything without any specials or sales included. This way you know “top-dollar” estimate of what this process will cost you.
- Home Inspector Website Template ($495/one-time)
- Domain (Approx. $25/year)
- Hosting (Approx. $26/month)
- ElementorPro (Approx. $50/year)
That makes the total cost of everything you need for your website to be $882 total for the first year. Approximately $570 will cover everything getting started with the exception of the monthly hosting expense.
After that, it will cost you $75 every year when your Domain & ElementorPro renew. Then your $26 monthly hosting dues will continue.
Of course, there are always other “features” that you can add to your website with additional WordPress Plugins, but any of those I suggest that aren’t part of the initial build will be reviewed in their own blog post with the cost listed there.
How Long Does It Take To Make A Home Inspector Website?
As a designer, I can tell you that this is a touchy subject. Because this blog post is EXCLUSIVELY FOR THE HOME INSPECTOR WEBSITE TEMPLATE, I’m only going to be covering how long it takes to make a home inspector website with the template.
DISCLAIMER: I am giving extra time for each step so don’t worry or freak out about the end number.
- Buying A Domain (30 Minutes) – This is the process of buying your .com domain. If you still have to come up with a business name or anything like that, of course, it will take more time.
- Setting Up Hosting Servers & Installing WordPress (45 Minutes) – Close to 20 minutes of this is just waiting for the software to set up the server & install WordPress so that time can be spent doing something else productive.
- Filling Out Data Drop Worksheet & Gathering Files (30 Minutes) – This is just putting your information together in a document so it is faster to build our website.
- Installing The Ultimate Home Inspector Website Template (30 Minutes) – The majority of this is waiting for the software to install the template so all of your attention and time isn’t required here either.
- Customizing The Template (60 Minutes) – This can take more time depending on how custom you want to get. The initial “customization” is to make the template yours. This is getting your logos, name, phone number and everything in place across all of the pages.
So in the end, if you’re just doing basic customization to get a killer website, it can be done in under four hours. Once again, I’ve added extra time to each step. As a professional designer who made the template and knows the process and familiar with all the software, I can build a professional home inspector website in about an hour, including registering a domain and setting up the hosting.
Now I need you to READ THIS: RESULTS ARE NOT TYPICAL. I’ve been neck deep inside of this template for over a year so it only makes sense that I could run through the process really fast.
If you are tech savvy, it is possible that you can do the same, but there’s no guarantee.
If you are going to customize every page, you also need to keep in mind how many pages you’ll be customizing. By default, the home inspector website template has twenty-four (24) different “Pages” created.
Both “Code Of Ethics” and “Standards Of Practice” pages are place-holder pages. This means there is NO CONTENT on the pages. Since different states and organizations have different S.O.P.’s and C.O.E.’s I left them blank for you to put in the proper information for your business. So you may also want to include 5-10 minutes for you to get the proper info for your website’s “Legal Pages” together.
What Do You Need To Make A Professional Home Inspector Website?
LET'S GET STARTED!
- The Ultimate Home Inspector Website Template - If you do not yet have the home inspector website template, you can get it here. [CLICK HERE - This will open in a new window]
- Logo in .png format that is optimized for the web (MAX WIDTH: 350px Suggested dimensions: 350px x 100px) - If you don't have a logo yet, don't worry. There are options and one of which offers FREE LOGO DESIGN FOR HOME INSPECTORS! Check Out The Blog. [CLICK HERE - This will open in a new window]
- Website Icon - This is what shows on a phone when people add your site to their home screen. This should also be optimized. (Recommended Size: 512px x 512px) If you're not sure what a Site Icon is, or how to use it, you can check this blog out. [CLICK HERE - This will open in a new window]
- Headshot - This is best being waist up, not zoomed in on your face. This ALSO should be OPTIMIZED.(Recommended Size: 800px x 800px)
- Hero Image - This is the main image in the background that people see as soon as they land on your home page. It doesn't have to have you in it. It can be a picture of a house, your work truck, or even a picture of you "doing" an inspection. (Recommended Size: Max Width 1500px Min Height 400px) If you plan on having a parallax scrolling effect (SEE VIDEO) then the recommended size is 1500px x 844px.
- Data Drop Worksheet - This is a document that comes with the home inspector website template that helps you organize what you need to get started, as far as your links, and info that is going on the website. THIS NEEDS TO BE FILLED OUT TO THE BEST OF YOUR CAPABILITIES.
- A GREAT Branded Username - If you are just now starting out I HIGHLY RECOMMEND YOU READ THIS HOME INSPECTOR BUSINESS NAMES BLOG POST. You probably should read this even if you already have a domain and are active on social media. [CLICK HERE - This will open in a new window]
- A .COM Domain - Once you have a great branded username it's time to get your domain. Remember the shorter the better, and ALWAYS USE .COM. There is a full walkthrough guide on who we recommend for domains. [CLICK HERE - This will open in a new window]
- A Hosting Account With WordPress Installed - You don't need anything but a base WordPress installation on a quality & fast server. Follow along with our home inspector website hosting guide and learn what the recommended hosting package is, how to set up your server, and how to install WordPress. [CLICK HERE - This will open in a new window]
- A Licensed Copy Of ElementorPro - This is the page builder that is used to build the website template, and how you are going to be editing and adding to it. There is a small blog post on why I chose to use this software along with an exclusive Inspector Branding Link to sign up. [CLICK HERE - This will open in a new window]
Ready To Build A Home Inspector Website?
At this point, you should have the home inspector website template files, a default installation of WordPress on your server & at least a single-site licensed copy of ElementorPro.
(If you are not there yet, go back up top and follow each step.)
As mentioned earlier you need the Home Inspector Website Template download file. It will download as a .zip (compressed) file. The first thing you need to do is “Unzip” the file.
When you extract files from a zipped folder, a new folder with the same name is created which contains the files. The compressed (zipped) version also remains.
How to Extract or Unzip .zip Compressed Files
- Right-click the zipped folder saved to your computer.
- Choose “Extract All…” (an extraction wizard will begin).
- Click [Next >].
- Click [Browse…] and navigate to where you would like to save the files.
- Click [Next >].
- Click [Finish].
What's Inside The Home Inspector Website Template Folder?
- Installer Folder - This folder includes the template and the installer plugin for WordPress.
- Theme Templates - This folder includes the individual templates for the "Theme Builder" (Header, Footer, Single Post, Blog Archive, 404 Error)
- Content & Page Templates - This folder includes each of the individual templates for the pages. (Home, About, FAQ, Blog, Pre-Listing, Pre-Purchase, etc.)
- Bonuses - This is where you will find the FREE Stock Photos, InterNACHI Optimized Certifications, etc.
- Data Drop Worksheet - This document is where you will gather the information about your business. Use this form to gather the information required.
- Home Inspector Website Template Lease Agreement - This is the agreement for the website template. PLEASE READ.
- Legal Page Disclaimer - This is a disclaimer YOU NEED TO READ BEFORE YOU USE THE TEMPLATE LEGAL PAGES.

Data Drop | Gathering Content For Your Website
The first thing I would recommend is to create a folder for your website. As you can see in the example below I have the folder titled “TRUSTEDHIS”. We’ll call this the Business Folder.
Once you have a Business Folder, you need to move the template download folder inside of it.
Then I have a separate folder for my “Core Business Files”, which holds the vector design files for my logo and stuff like that.
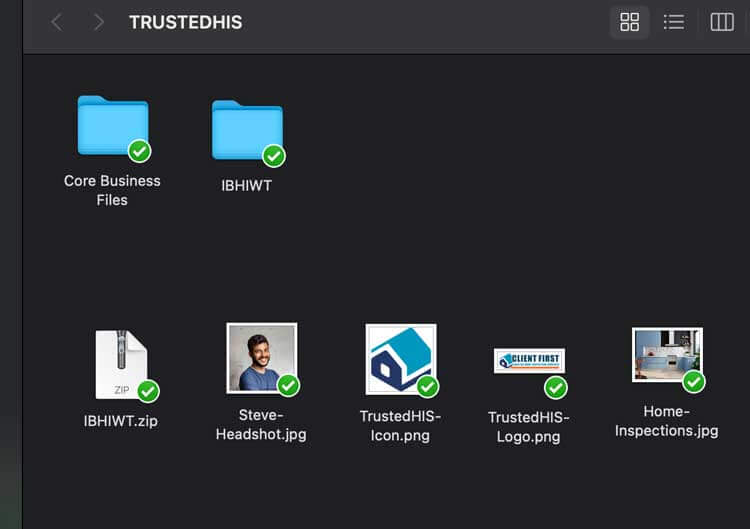
Aside from those two folders I have FIVE other files.
- IBHIWT.zip - This is the main download file for the template
- Steve-Headshot.jpg- This is the example "Headshot"
- TrustedHIS-Icon.png - This is the example "Site Icon"
- TrustedHIS-Logo.png - This is the example "Logo"
- Home-Inspections.jpg - This is the example "Hero Image"
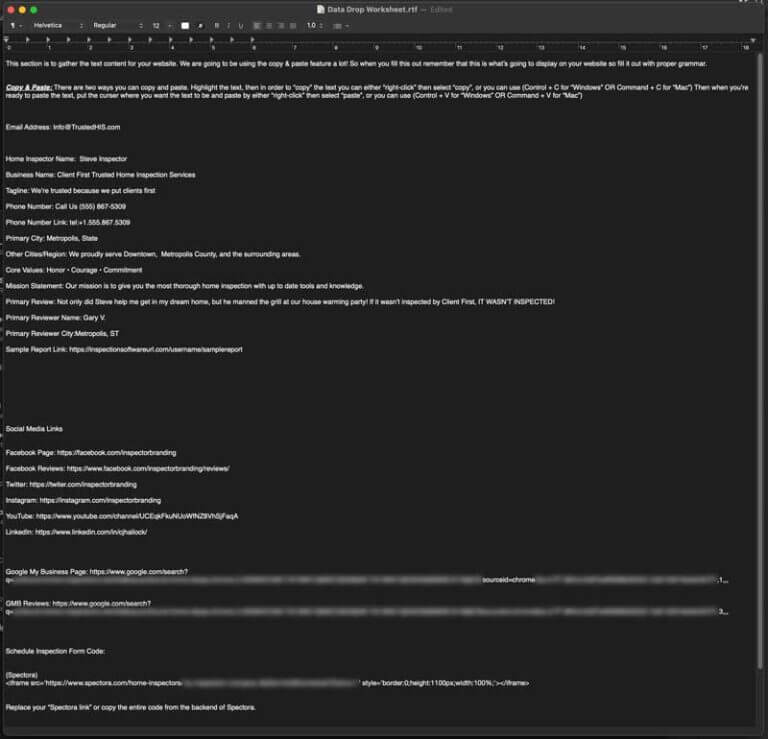
Once you get the images resized and optimized, you need to open the template folder and open the Data Drop Worksheet. Take some time and fill the worksheet out to get the rest of your data together before we start our website. This will make it easier so we can just “Copy & Paste” the information from the worksheet into the website where needed.
As you see in the placeholder content, you need to just replace your information and keep the rest as you see it.
There are some fields that are more that just text, so please pay attention when filling out the Data Drop Worksheet. ONLY REPLACE YOUR INFORMATION LEAVE THE REST THE SAME. For example in the Data Drop Worksheet under “Phone Number Link” you’ll see the default info is tel:+1.555.867.5309 when you change it on the worksheet, it should look like this…. (for example)
tel:+1.423.930.8001
This is because for the template to work right these links, and text need to be formatted exactly as it is on the worksheet. When we put this info into the home inspector website template, it will automatically place this information for you where needed throughout the entire website.
IF YOU HAVE NOT YET FINISHED THESE STEPS PLEASE FOLLOW THE STEPS LINKED IN THE BUTTON BELOW.
The Ultimate Home Inspector Website Template Walkthrough
Installing The Home Inspector Website Template
The first thing you need to do is log into your WordPress website.
Once you are logged in, you need to hover over “Plugins” and then click on “Add New”.
Once you are there you need to click on the “Upload Plugin” button. This will give you an option to search for the “Template Installer” by clicking “Choose File”. You can find the home inspector website template installer inside of the template folder “1 – Installer”.

Once you find & select the “Template-Installer.zip” file, you need to click on open. This will make it where you can just click on “Install Now” to finish uploading the installer.
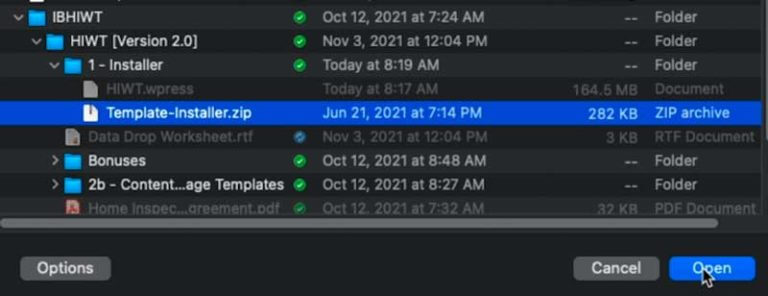

The next step is to “Activate” the “Template Installer”. At this point, the WordPress software has opened the Template Installer and installed the files need to run. So now all you need to do is click on “Activate Plugin”.
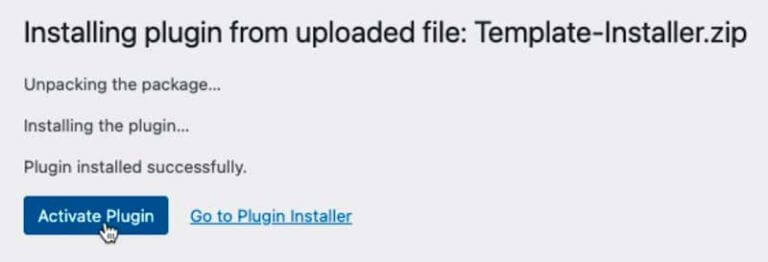
After you click on Activate Plugin, it will redirect you to the “Plugins Page” and at the top of that page you should see the success alert.
Now that you have the “Template Installer” installed and activated, it is time to upload the “Ultimate Home Inspector Website Template“.
You’ll want to click on “All-in-One WP Migration” on the left sidebar. Once you get the other options to open up, you’ll click on “Import” then drag the home inspector website template file “HIWT.wpress” into the upload field.

Once you have dropped the template into the upload field, it will start the import process. You can grab yourself a cup of coffee, this process can take upwards of 5-10 minutes depending on the speed of your internet. During this time DO NOT CLOSE THE BROWSER. Wait until the template is imported properly and you get the alert box (Fourth Box In Example Below) then click on the “PROCEED>” button.

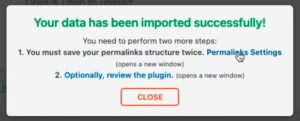
After you click on the “PROCEED” button, a dialog box will appear telling you that “Your data has been imported successfully!”. As you can see in the image below it says you have two more steps. The second step is optional. So we’re only going. to worry about the first step. Our Permalink Setting. So click on “Permalink Settings”.
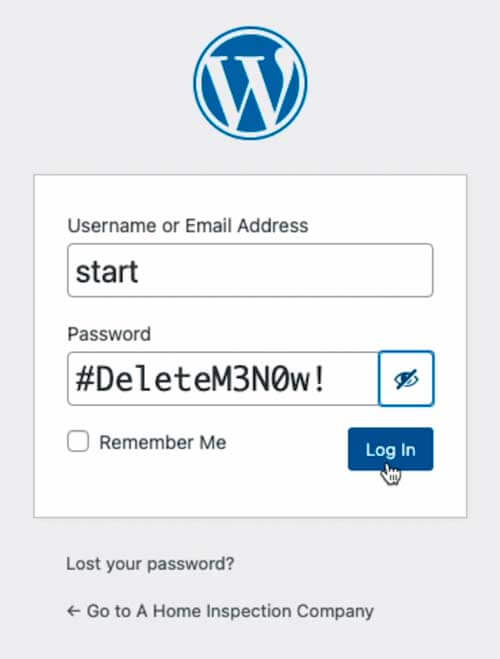
As mentioned in the alert above, you are going to be automatically logged out. That is because with the home inspector website template, it’s showing new log in information. So we’re going to have to log in again. But the info will be different than what you used originally to log into you WordPress Dashboard. For now you will need to use the information listed in the image.
Your “Username” will be: start
Your “Password” will be: #Delete M3N0w!
If you are on a personal computer, you can select the box to “Remember Me” so that it makes it easier to log into your website in the future.
Once you have finished that, you need to click on the “Log In” button.
Now that you have logged back into your website, you will land on the “Permalink Settings” page.
A permalink or permanent link is a URL that is intended to remain unchanged for many years into the future, yielding a hyperlink that is less susceptible to link rot. Permalinks are often rendered simply, that is, as clean URLs, to be easier to type and remember.
I can go deeper into detail but you can read the blog post here.
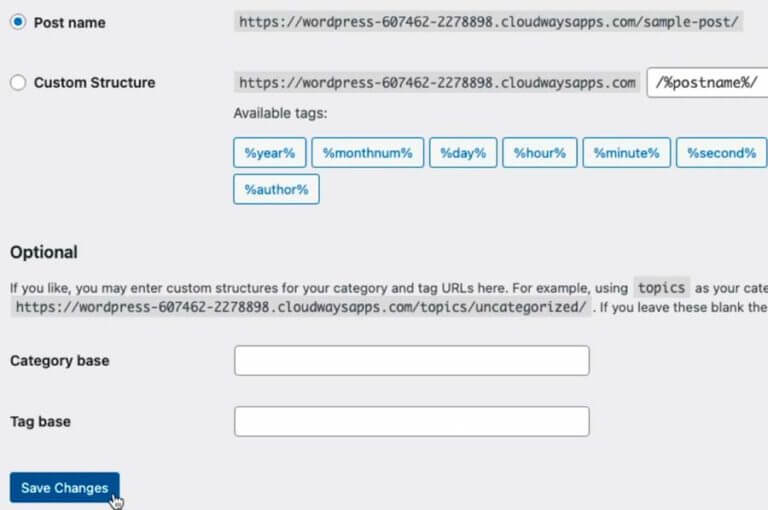
By default “Post name” should be selected. If it is not, select “Post name” then click on the “Save Changes” button.
DISCLAIMER: For the Home Inspector Website Template to work properly you will need the permalinks set to “Post name”.
DO NOT SKIP THIS STEP!
Before we get any further we need to make sure our website is secure. Because this information is public, we need to create a new WordPress user & delete the default user for the home inspector website template.
Go down on the left sidebar and go to Users > Add New

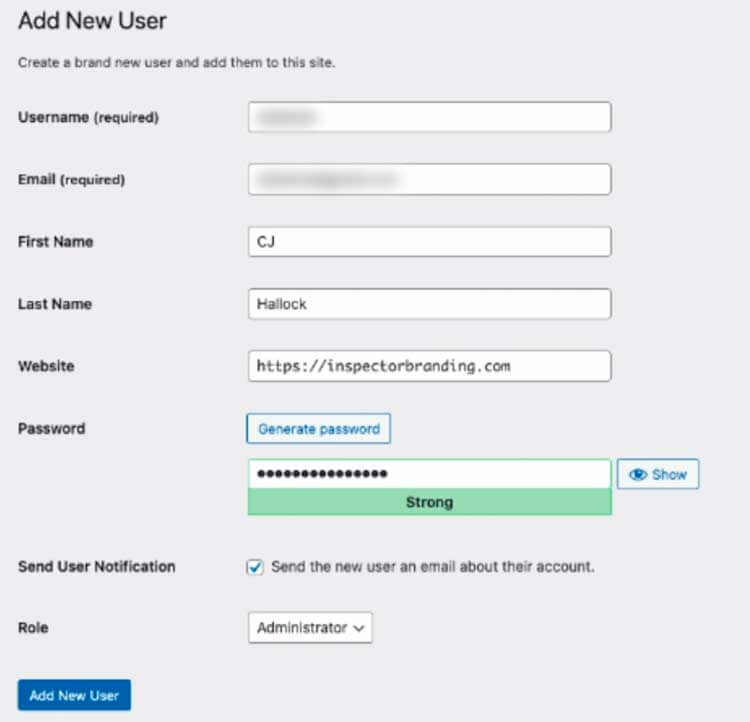
Username: This needs to be around 6-10 characters and needs to be original. DO NOT USE “ADMIN”, “WEBMASTER” or anything else like that. Feel free to use your name or nickname.
Email: Put in a valid email address. Your new email address we created earlier would be
Fill out your First Name & Last Name.
In the “Website” section you need to include the full link so it should look something like this ( https://yourbrandsname.com )
Password: This is a touchy subject. I know how much you may want to create a password that you can remember, but that could cost you in the end. You need a secure password
Click on the “Show password” button to show & edit your password.
After you fill out all of your information, change the “Role” to Administrator and click on “Add New user”.
***IMPORTANT NOTE***
You need to do two more things.
First is in the upper right-hand corner you need to hover over “Howdy, start” and click on “Log Out”.
Now that you are back on the login page you need to log in with your new username & password.
Next thing on the list is to delete the old username. You can do this by going to Users > All Users
Hover over the old user “start” and click on “Delete”
On the next page, you need to check “Delete all content.” and then click on “Confirm Deletion”

Activating Your Elementor Pro License
Elementor Pro is the design secret that let me make this template the way I did. As a designer, I’ve used a ton of page builders over the years, and the moment I first used Elementor I was sold & signed up for the highest tiered package they have so I can use this for myself and all of my clients. Unfortunately, even though I have been on their largest tier since they were about 9 months old, it still doesn’t give me the rights to give it to you with the home inspector website template. That is why you will get warnings and certain features can crash if you don’t activate your own license.
In order to activate your license, you first need to make sure you are logged into your Elementor account. (If you haven’t signed up for ElementorPro and purchased a license for your website, you need to now.)
While you are logged into your Elementor account, go back into your WordPress Dashboard.
You should see a pop-up box from Elementor that says “License Mismatch”. Click on “Reactivate License.” This is going to get you to the “Elementor License” page. You can also get here on the sidebar you will want to hover over Elementor to get the drop-down menu to open. In the drop-down menu, click on “License”.
You need to click on “Disconnect” to free the plugin to attach to a new account. Once you’ve done that the “Activate License” box will open. Click on “Connect & Activate”. It will take you to the Activation window for Elementor. Click on “Activate”. Now, your Elementor License is Activated!!


WordPress Updates
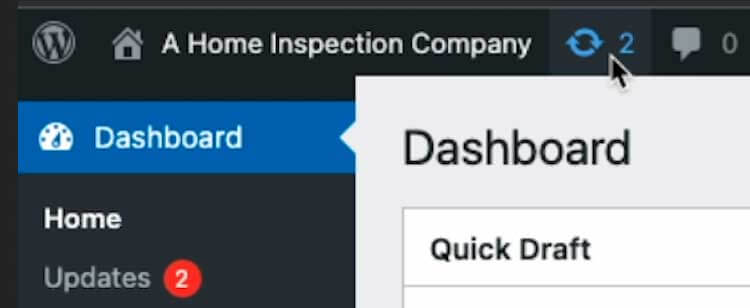
The next thing we need to do is update any plugins that have updates available.
In order to do this, you will need to click on the “Updates” button on the “Toolbar” at the top of the website.
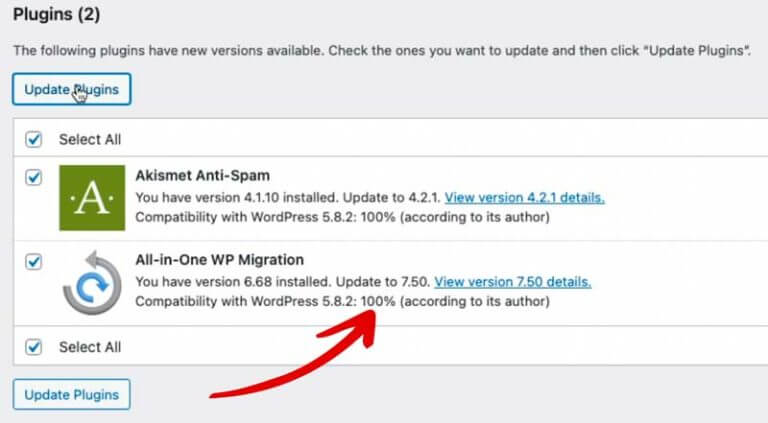
You may have a different amount of updates available depending on the plugin & theme developers. Either way, we’re going to update any plugins or themes that have available updates. Once you click on the “Updates” button, you will land on the updates page.
There are three main “update” sections. The first is the main “WordPress” software. By default, most of the time this will be automatically updated by Cloudways. The next section is for “Plugins”. The final section is for “Themes”. Inside of each available update is a compatibility score. You need to check this to be sure it is at 100%. Once you check that, select the available updates and click on the “Update Plugins” button.
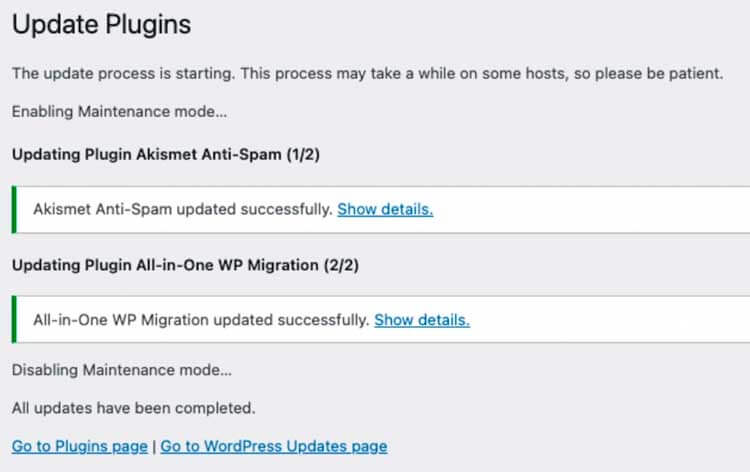
Once you finish updating your plugins, you will need to click on “Go to WordPress Updates page” and repeat this step for the WordPress themes if there are any updates available.
The next thing we are going to do is delete plugins that are not needed. When the core files of WordPress is installed by Cloudways they automatically install two plugins that we are not going to use with our website. So you will need to go to the “All Plugins” or “Installed Plugins” page and select both “Akismet” and “Hello Dolly” and in the Bulk Actions drop down box select “Delete” then click on “Apply”.
If you get a “Pop up” window asking “Are you sure you want to delete the selected plugins and their data?” click on OK

Once you finish that, you will see on the Plugins page, the plugins were deleted.

Let's Start Customizing The Home Inspector Website Template
Congratulations, WE’RE DONE! OK, not really. But we are finished installing the home inspector website template. The next thing we are going to do is start to customize our website. We are actually starting with the visual aspects of “Branding”. In order to get started, hover over “Appearance” on the left sidebar and then click on “Customize”. Once you are in the “Customize” settings, you’ll need to click on “Site Identity”.
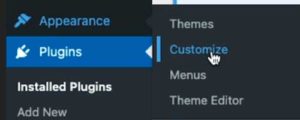

The “Site Identity” tab is basically for your Brand’s Identity. This tab is where you’re going to upload your logo. You are also going to be changing the “Site Title” to your business name and changing your “Tagline”. Then you will finish the Site Identity tab by uploading your Site Icon.
1. So let’s get started with the logo. Click on “Change logo”. When the media upload screen appears, you can either drag your file into the window, or click on “Select Files” to find your logo file on your computer. After you upload your logo, the media library file window will open. You need to add an “Alt Text” to your image. If you are not sure what to write, for your logo and icon, I would just put the name of your business followed by logo or icon.
For example: Client First Trusted Home Inspections Logo
Once you finish, you will need to click on “Select” to use the image. Then, if your image ratio is not correct, you will be prompted to “crop” your image. If you have extra spacing and cropping doesn’t actually crop your logo, then by all means, crop your logo. But if it shows that it will crop part of your logo off, then click on the “Skip Cropping” button.
2. After you upload your logo the next section to customize is you Site Title. This is very important. You want to put in your entire business name. If you have a shorter name, you can add your primary city. If not, just leave it as nothing but your business name.
3. Then we move on to the Tagline, remember the importance of your tagline. Keep it short and remarkable.
4. And the last thing in this step is the Site Icon. The process for this will be similar to that of the logo.
You can see the diagram below for the WordPress Customization.
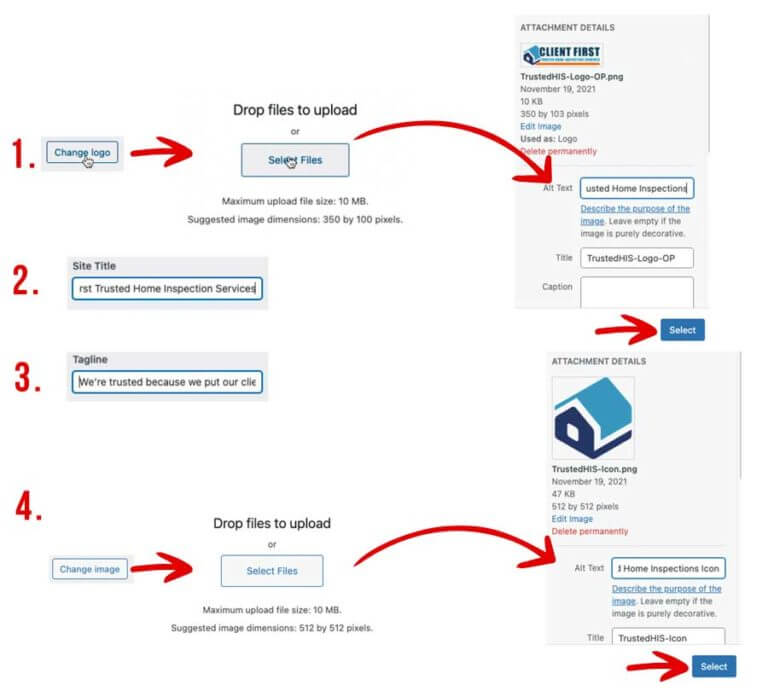

Now that you have the Site Identity settings and images finished, you should take a second to double check all four fields.
Once you’ve checked your Logo, Title, Tagline, and Site Icon, you need to click on “Publish” to make the changes live.

Your Own Link Shortener | Introducing Pretty Links
Pretty Links is a free plugin that gives you the capability to have your own link shortener build into your website. By default, with the home inspector website template, I’ve created some default short links. These are used throughout the template to link out to these properties.
Start by clicking on the “Pretty Links” tab in the sidebar when you are in your dashboard. This is going to show you all of the current Pretty Links. You will need to go through each of the links and fill in your own information.
Start editing each link by clicking “Edit” under the link. Once the Pretty Link page is open, replace the “Target URL” links with your links. For the links that are already made, NEVER CHANGE THE “Pretty Link”. This is the extension off of your website. The template needs this to automate the process to put your links where they need to go.
After you have put your information into the Target URL area, Be sure that the “Redirection” is set to 301(Permanent) and click on the “Update” button.
Repeat this process for each of the links.


Custom Fields | The Automation Process
The next step is where the magic happens. Within the sidebar, towards the bottom, you will see the “Custom Fields” tab. Click on this and it will take you to the “Field Groups” page. We only have one group, so under “Website Template Build” click on edit.

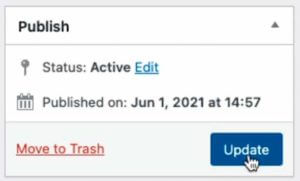
The next page is where each of the custom fields is located. There are a total of twelve different “Custom Fields” that we are going to be editing. While on the edit page for each of them you will be replacing the content in the “Default Value” field with the content from the Data Drop Worksheet. After you have finished with all twelve fields, scroll back to the top and click on the “Update” button.

After you finish updating the custom fields, the next thing we are going to do is replace the placeholder “headshot” with our own. This is another automation feature to the home inspector website template.
In order to replace the “Headshot” you need to click on the “Media” tab within the sidebar. This will take you to the media library. Browse through the images until you find the default headshot. Click on the thumbnail. This will then open up the “Attachment details”. On the right-hand side of the page, scroll down until you see “Replace media” then click on “Upload a new file”. On the next screen you just need to click on Choose File and select your headshot.
Then you need to find the “Replacement Options” and select “Replace the file, use the new file name and update all links”. After that, click on upload.

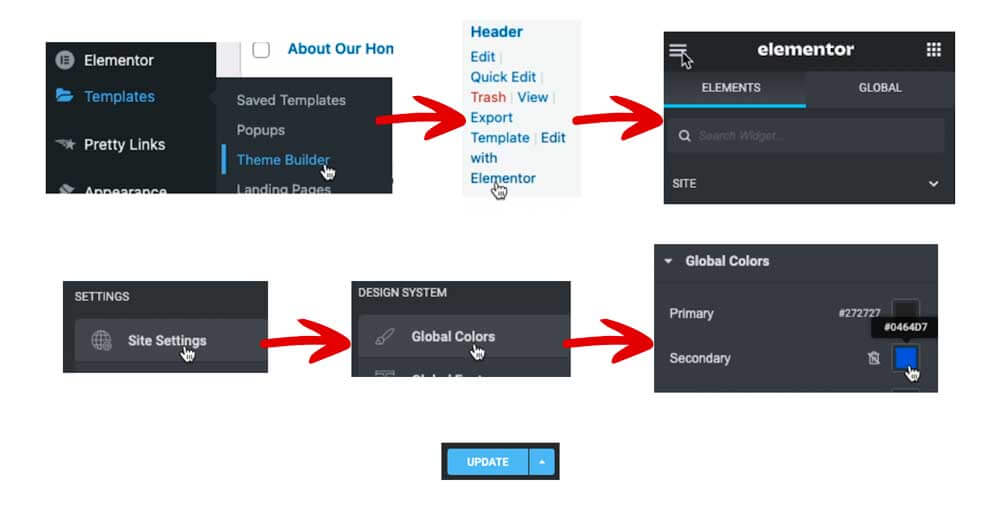
What we’re going to be doing now is setting our brand’s main color. Setting the color in the home inspector website template will incorporate your color throughout your website.
In order to do that, we’re going to start by going under “Elementor” in the sidebar of the dashboard and look for “Templates”. In the dropdown for the “Templates” tab you will find “Theme Builder” … click on that.
You will then be taken to a page with an overview of the theme builder templates. We’re going to start by clicking on “Edit with Elementor” under the “Header”.
Once the next page loads, click on the hamburger (or the three horizontal line icon in the upper right hand corner of the “Elementor” sidebar.
Then click on “Site Settings” and then “Global Colors”.
Once you’re on the “Global Colors” tab, you need to open the “Secondary Color” and set it to your brands main color.
And of course, once you finish, be sure to click on “UPDATE” to save your progress.
At this point, we have THREE STEPS LEFT to finish setting up the Ultimate Home Inspector Website Template! We need to add the reviews we want on our review page, adjust the settings on the contact form to make sure you get your emails, and put in our home inspection scheduler. After we finish these three steps, we just have to attach your domain, and a few quick security steps and we’ll be done.
Home Inspector Website Template| Reviews Page
This is where the long term magic happens for your business. Your businesses reviews are social proof that you really are as good as you say you are. They ultimately are the icing on the cake to help you get new clients.
In order to replace the placeholder reviews on your reviews page, you need to go to the “Pages” tab in the sidebar of your WordPress Dashboard. Once you get to the “Pages” tab, you need to find the “Reviews” page.
By default the page name is “Our Reviews | Professional Home Inspection Services”.
Once you locate the page you need to click on “Edit with Elementor”. Then you will be going into each of the three placeholder reviews and editing the content. You do this by clicking on the blue pencil in the upper right hand corner of the “element”.
Once you have the “Testimonial” edit sidebar open you need to put your “review” in the “Content” block, change the “Name”, and if you want to include the city, you can put that in the “Title”. After you finish updating your reviews, don’t forget to click on “UPDATE”.
Home Inspector Website Template | Contact Page
While still “old school”, contact pages are the glue between you and your customers. While I do put a lot of focus on communication via social media, not everyone is on social media. So you need to make sure they can contact you either way.
There isn’t a lot of work involved in the “Contact Page” but we do need to make sure that you get your clients emails when they use the form.
Like you went to the “Reviews” page, you’ll need to do the same for your contact page. Find the page “Contact Us | Professional Home Inspection Services” and click on “Edit with Elementor” under it.
When the editor opens, click on the pencil to edit the form. Then you will go down in the sidebar and look for “Email”.
You need to put your email address into the “To” and the “From” field. It is highly recommended if you have a “Gmail” address, use it. There is a lot of different reasons why email can go to a spam folder or not even get delivered. While using Gmail doesn’t guarantee delivery, it does increase the probability.
You can also change what the Subject line is and what the “From” field says. You don’t have to do this but it is an option.
Once you finish customizing everything click on UPDATE.
Home Inspector Website Template | Schedule Page
The last of the magic happens here. Let’s be honest, without scheduling home inspections a home inspector doesn’t make any money. But you already know that. So let’s jump into adding the “scheduler” to the Schedule Page.
Just as we have been doing, find the “Schedule Your Home Inspection” page and click on “Edit with Elementor”.
When the editor opens you will see a gray box towards the middle of the page that has </> in the middle of it. This is an “HTML” element. Click on the blue pencil to edit the element.
In the sidebar, you will see the HTML Code Box. Paste in your “code” for your scheduler here.
Don’t forget to click “Update”.
I will not be covering the legal pages in the guide but you can see me go through the pages in the video walkthrough on top of this page.
Attaching Your Domain
Now that we have reached this point, it’s time to attach your domain. In order to do this, you will need to be on the Access Details tab inside of your Cloudways account & another tab open with HostYak (or wherever your domain is registered). We are going to be copying the Public IP for our “application” inside of Cloudways. Then we are going to take that IP Address and go over to our HostYak account.
Once you are on the “My Products” page, you will see your domain listed. On the right hand side of the screen, there is an option titled “DNS”. Click that.
This will take you to the DNS Management. Inside. of the “records” box you will see an “A” Record. We are going to edit this and change “Parked” in the “Value” field to the IP Address we copied from Cloudways. Once you have done that, click “Save”.
Now, the domain is pointing to the server, but we need to tell the server what application to load.
So the next thing to do is go back to Cloudways & click on Domain Management under the Application Management sidebar on the left. On the next page, you need to enter the domain for your website under “PRIMARY DOMAIN”. NO HTTPS OR WWW. (Example: trustedhis.com)
After you’ve put in your domain, click on “SAVE CHANGES”.
Installing Your SSL Certificate
I cant begin to tell you the importance of a secure website. The SSL “Security” Certificate is a major part of that process. It’s also a major key to ranking on the search engines.
Years ago, this process could take hours. But with today’s technology, with the help of Cloudways, we can install an SSL Certificate in a few minutes and it’s 100% FREE with your Cloudways Hosting Account!
All you have to do is click on the “SSL Certificate” tab on the right, under “Application Management”. Then under the settings, enter the email address that your domain is registered with under the “Email Address” field. Then type in your domain in the “Domain Name” field WITHOUT THE WWW. After you have entered the domain, you’ll then click on “ADD DOMAIN”. When the “Domain Name 2” field appears, you’ll then type in your domain WITH THE WWW.
After you finish with that, simply click on “Install Certificate” and you’re done.
I Just Want To Say THANK YOU!
Thank You for using the “Ultimate Home Inspector Website Template”. Putting your trust into me & the home inspector website template, means a lot. As I am sure you can tell, I’ve put hundreds if not thousands of hours into building the best home inspector website template one the market!
I hope this “Ultimate Home Inspector Website Template Guide” has been helpful.
As always, if you have any questions about the process of installing or using the home inspector website template, or anything marketing and/or branding related, PLEASE FEEL FREE TO CONTACT ME! You can always use the messenger on the page, our contact form, or the best way is to shoot me a DM on Instagram.
Be Great & Stay Boosted!
CJ

